


Showing posts with label Tweaks. Show all posts
Showing posts with label Tweaks. Show all posts
Top 10 Ways to Speed Up Your Slow Technology

As fast as your technology may have been on day one, it's probably not quite so speedy now. That doesn't mean you can't restore it to its former glory. Whether it's your desktop, laptop, or mobile device, here are 10 great ways to speed up your slow technology.
10. Clean Up Your Drive
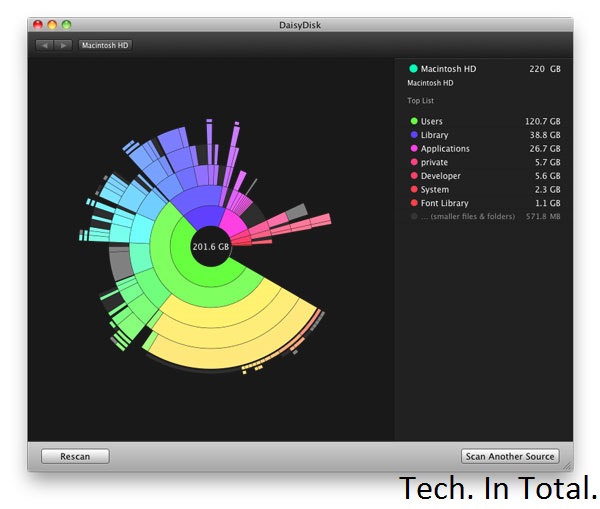
Whether your drive is in a computer or a mobile device, if it gets filled up you're probably going to lose some speed in the process. Although you may have a number of important files on that drive, there's still a bunch of stuff you can get rid of. On a desktop computer, the easiest way to find what's taking up a bunch of space is to use a disk space analyzer. Then you can use that information to figure out what to delete.
Most Android users can migrate data to a microSD card and call it a day, but if you're rooted you can use an app like SD Maid to clean things up automatically. If you're running iOS, you don't get an automatic method for cleanup but you can view what's taking up all that space. Head on over to the Settings app, tap General, and then tap Usage. You'll get a rundown of which apps are using how much space so you can delete them, or at least delete some of the data they're saving on your device.
9. Install a Custom ROM on Your Android

When Android 4.1 Jellybean is released (and actually on real devices), the OS' sluggishness might be a thing of the past. For those of us still running 4.0 or earlier and are bothered by speed issues, choosing a speed-optimized ROM can help remedy the issue. Speed is probably not the first priority of the ROM that comes with your device, so do a little research to see what's available and if you can flash something better.
8. Speed Up Dropbox's File Syncing Speeds

You can only upload as fast as your connection allows, but Dropbox—by default—limits your upload speeds no matter what. Instead of maximizing your connection, it automatically choices whatever speed it believes is optimal. You don't have to let Dropbox choose for you. You can limit it to any speed yourself, or remove that limit entirely:
On Windows, Click Dropbox in the system tray, then Preferences > Bandwidth; on Mac, click Dropbox in the menu bar, then Preferences > Network > Bandwidth > Change Settings. Once there, change your Upload rate to "Don't limit", or if you're familiar with your network's upload bandwidth and want to exercise a little more control, pick an upload limit that you're comfortable with in the Limit to field.
That's all there is to it.
7. Uninstall Unnecessary Apps

There's nothing wrong with a few apps on your computer, but when you're running a ton of them it can slow things down. If you need them you need them, but there are probably a few you don't. At the very least the apps are using your disk space, if not taking up additional resources, so it's good to audit your collection and uninstall what you don't need. Unsurprisingly, uninstallers can make this process a little easier for you. They give you a list of your apps and let you remove them with a few clicks. You still have to audit the list yourself, but it's a process that's much more simple than manual removal.
On mobile devices this isn't so much of an issue as both iOS and Android make it pretty simple to get rid of an app you don't want. Sometimes you end up with a lot of apps and aren't sure what you can get rid of.
6. Perform System Maintenance and Optimization

Modern operating systems perform maintenance tasks on their own, but these automated routines aren't perfect. It's a good idea to perform these tasks yourself on a monthly or bi-monthly basis. On Windows, CCleaner will get the job done. It works on OS X as well, but we prefer Onyx.
5. Speed Up Browsing Times by Optimizing Your DNS Settings

The amount of time you spend waiting for a site to load can be a bit faster if you're using the best DNS servers. The problem is, which servers you ought to be using will depend on your location. Namebench is a free utility for Windows, OS X, and Linux that'll run tests to figure that out for you so you can optimize your DNS settings. The test can take a little while to complete, so run it, take a break, and come back to better DNS server suggestions.
4. Install a Lightweight Operating System

Sometimes your computer is just old and any speed gains you can tweak out of it are not going to be worth your time. Instead, it's better to just say goodbye to the machine as you know it and give it a lightweight operating system it can run with ease. Which OS should you pick? some good ones for netbooks (which may do just as well for old machines), but generally that means some flavor of Linux. While that'll work for a lot of Tech. In Total. readers, it won't for everyone. If you'd rather stick with Windows, trim it down to the bare essentials. It may not be as fast as some of those tiny Linux distributions, but it'll be a lot faster than a feature-rich copy of Windows.
3. Boost Your Boot Time

You're probably not rebooting your computer with too much regularity, but that can make it all the more frustrating when you have to wait to see your desktop again. While booting up is always going to take a little while, you can speed it up. Windows users have a great tool called Soluto that helps you fix a number of issues that cause slow performance, including problems that affect boot times.
OS X users don't have such a nice solution, but OS X is pretty quick when it comes to the actual boot screen. More slowness occurs after you see the desktop and all the little things you have installed start to open. If you want to remedy that situation, just head into the System Preferences app, the Users and Groups preference pane, and click on your user. In the Login Items tab you'll have a list of all the stuff that you've set to run when you log in. If there's anything in there that you don't really want, just remove it from the list and your startup time will improve. Users of OS X Lion (or later) may also benefit from disabling the Resume feature, which restores your computer to its previous state as soon as you boot up. You can do this in the General preference pane in System Preferences by unchecking the box next to "Restore windows when quitting and re-opening apps."
2. Overclock Your Processor

If you literally want to speed up your computer, that's what overclocking can do for you. Some processor overclocking provides greater speed gains than others, so you'll want to do a little research before you jump right in. The process takes quite a bit of time, commitment, and care, so you don't want to bother if you're in for negligible speed gains. You can even overclock your video card, too.
1. Get an SSD

By now, it shouldn't come as a surprise that we think the SSD is the best upgrade you can get for your computer and now is a great time to buy one. When home for the holiday, I stopped in at Microcenter and found 120GB OCZ Vertex and Agility SSDs for under $100. I've seen online deals for even less from time to time. SSDs have never been more affordable and they can make a sluggish computer feel brand new. If you've been sitting on the fence about making the upgrade, now's a great time to make the change. Just know that you'll never go back.
EcDB Is an Online Database for Your Electronics Inventory

Tweaks As most hobbyist and electronics hackers know, keeping tabs on all the tiny components, pieces, and parts inside your toolkit is almost impossible. It's especially troublesome when you go to start a new project only to realize that one piece you need is already in use elsewhere or lost inside a box. To help solve this, ecDB is a webapp organization tool that helps track your electronic components.
The webapp is still in beta, but its core feature set, the management and tracking of electronics components, works great. You have to manually enter in each of your different components, but once you do you can set them aside in projects, track a shopping list of what you need, and quickly see what you have on hand. If it's a complicated project you can upload images with schematics so you can keep of everything in a centralized place. If you're into electronics hacking this is a very handy organization tool.
ecDB | via Hack A Day
Auto-Forward Past and Future Emails in Gmail

Gmail currently allows you to automatically forward emails from any address, but if you're looking to bulk forward old emails you have to do it manually. To solve this, Digital Inspiration outlines a way to do just that by using Google Docs.
This is handy if you're using webapps like Evernote or Tripit and you want certain types of emails from the past as well as the future to be forwarded to them. You can create your own two column Google Spreadsheet or use Digital Inspiration's template. In your left column you write your label. Your forward addresses go on the right. Once you have your columns filled out, run a script by clicking Tools > Script Editor > Triggers > Current Script's Trigger and then Add a New Trigger. Here, set the intervals you want the auto-forwarding to happen. Once it's setup, it will continue forwarding emails as they come in.
How to Auto-Forward Gmail Messages in Bulk || Via Digital Inspiration
The Get More Out of Google Infographic Summarizes Online Research Tricks for Students

Provided by the folks at HackCollege, the infographic reminds student researchers that you can use Google as a calculator and unit converter, how to find papers by a specific author in Google Scholar, and basic operators you can use. Here's the full infographic (click to expand):

- Infographic: Get More Out of Google || HackCollege via How-To Geek
Stop Firefox from Greying Out URLs in the Navigation Bar

Newer versions of Firefox grey out any text in the URL bar that isn't the domain of the site you're on. If this bugs you, you can turn it off with a simple about:config tweak.
To make URLs appear as straight black text, just open up a new tab and type about:config in the address bar. Promise Firefox you'll be careful, then search for the browser.urlbar.formatting.enabled setting.
Double click on it to change it to False, and close that tab. Your URLs should now appear without any of the grey text.
How to Create Animated Cinemagraphs
I was looking for this thing from many days and then Lifehacker brought me what i was searching out
Today i am going to share the same with you
Cinemagraphs are a really compelling take on the traditional animated GIF, only showing motion in a portion of the frame to focus on a specific movement. This results in a very compelling looped animation and we're going to show you how to make one right now.
 To give credit where credit is due, the cinemagraph began with Jamie Beck and Kevin Burg on their tumblog From Me to You. (More on the history of Cinemagraphs here.) They've created some pretty amazing stuff, like the example on the left, so be sure to check out their work for inspiration.
 Our example isn't quite so elegant. (You can see it to the right.) As an example, I put together an (imperfect) cinemgraph that makes it look like I'm digging around in my nose for, let's say, buried treasure. In this post I'm going to show you how I made it so you can make your own, perhaps more tasteful, cinemagraphs. This process is better demonstrated on video, so watch the one at the top of the page for an in-depth walkthrough. If you want step-by-step instructions in text form, read on.
Step One: Come Up with an Idea and Shoot a Short Movie Clip
 To get started, you're going to need a movie clip to work with. You want to choose something where the motion on display can be isolated nicely. Coffee stirring and nose picking are just two options. There are plenty of others. Just avoid getting too close to your subject as you want the surrounding areas to be entirely still.
Once you know what you're going to do, record a short movie clip. Start with something very simple, as the longer the clip is the more frames you'll have to pull. 20-30 frames can be fairly time consuming, as you have to isolate the moving area in every single one, so be careful about being too ambitious. Creating a cinemagraph can be very time consuming, so limit the frames you need as best you can.
When you're done shooting your clip, transfer it over to your computer. It's time to get to work.
Step Two: Create Your Frames in Photoshop
 Photoshop can open movie files, so just drag your clip onto the app and you'll see the first frame like it's a standard still image. (Note: Photoshop can't read every type of file, so convert to an MP4 if you're having trouble with formats.) There are a lot of ways to move the frames you want to use into a new Photoshop document, but I like to copy them individually because I can skip certain frames that are unnecessary and choose exactly where I want to start and end in the clip. If you prefer another method, go right ahead. To start copying frames, go to the Window menu and open the animation panel. Scroll to the first frame you want to use in your movie clip, select all (Command/Control+A), and copy. Now paste that frame into a new layer in a new Photoshop document. You want to keep doing this for all the frames you're going to use. When you're done, you can close the movie clip and focus on the new Photoshop document.
Step Three: Isolate the Motion in Every Frame
 This part of the process is the most time-consuming. Basically, you need to erase the parts of each frame that you don't want to move. I like to do this by selecting the relevant, moving part with the polygonal lasso, inverting my selection (Command/Control+Shift+I), and refining the edge of that selection (Command/Control+Option/Alt+R) to increase the feather size so the edges are nice and soft. (You can also have a built-in feather by adjusting the settings of the polygonal lasso if you prefer.) Once you've done all that, just press the Delete key to remove the parts you don't need. Now repeat this for every frame.
Step Four: Tell Photoshop How You Want Your Animation to Play
 Creating the animation is pretty easy because you've basically done that already. You just need to go into the Animation panel you opened earlier and start by clicking the Frame Mode button. It's the one all the way in the bottom right corner. When you do that you should just have one frame. Make sure it looks like the starting point—meaning the only layer that's showing in your layers panel is the first frame—and then go ahead and click the "Duplicate Frame" button. (It's the one that looks like a little page icon and is to the left of the middle in the panel.) This will create a new frame based on the previous one, and you can go ahead and display the next frame in your animation. I did this by creating each frame in its own layer, then showing only the one that was supposed to be visible. (You can see this demonstrated in the video up at the top of the post.) You'll need to repeat this process for every frame. Just press the "Duplicate Frame" button, show the next frame, and keep repeating the process until every frame has been added.
Step Five: Save for Web
 Full size
Today i am going to share the same with you
Cinemagraphs are a really compelling take on the traditional animated GIF, only showing motion in a portion of the frame to focus on a specific movement. This results in a very compelling looped animation and we're going to show you how to make one right now.
To give credit where credit is due, the cinemagraph began with Jamie Beck and Kevin Burg on their tumblog From Me to You. (More on the history of Cinemagraphs here.) They've created some pretty amazing stuff, like the example on the left, so be sure to check out their work for inspiration.Step One: Come Up with an Idea and Shoot a Short Movie Clip
To get started, you're going to need a movie clip to work with. You want to choose something where the motion on display can be isolated nicely. Coffee stirring and nose picking are just two options. There are plenty of others. Just avoid getting too close to your subject as you want the surrounding areas to be entirely still.Once you know what you're going to do, record a short movie clip. Start with something very simple, as the longer the clip is the more frames you'll have to pull. 20-30 frames can be fairly time consuming, as you have to isolate the moving area in every single one, so be careful about being too ambitious. Creating a cinemagraph can be very time consuming, so limit the frames you need as best you can.
When you're done shooting your clip, transfer it over to your computer. It's time to get to work.
Step Two: Create Your Frames in Photoshop
Photoshop can open movie files, so just drag your clip onto the app and you'll see the first frame like it's a standard still image. (Note: Photoshop can't read every type of file, so convert to an MP4 if you're having trouble with formats.) There are a lot of ways to move the frames you want to use into a new Photoshop document, but I like to copy them individually because I can skip certain frames that are unnecessary and choose exactly where I want to start and end in the clip. If you prefer another method, go right ahead. To start copying frames, go to the Window menu and open the animation panel. Scroll to the first frame you want to use in your movie clip, select all (Command/Control+A), and copy. Now paste that frame into a new layer in a new Photoshop document. You want to keep doing this for all the frames you're going to use. When you're done, you can close the movie clip and focus on the new Photoshop document.Step Three: Isolate the Motion in Every Frame
This part of the process is the most time-consuming. Basically, you need to erase the parts of each frame that you don't want to move. I like to do this by selecting the relevant, moving part with the polygonal lasso, inverting my selection (Command/Control+Shift+I), and refining the edge of that selection (Command/Control+Option/Alt+R) to increase the feather size so the edges are nice and soft. (You can also have a built-in feather by adjusting the settings of the polygonal lasso if you prefer.) Once you've done all that, just press the Delete key to remove the parts you don't need. Now repeat this for every frame.Creating the animation is pretty easy because you've basically done that already. You just need to go into the Animation panel you opened earlier and start by clicking the Frame Mode button. It's the one all the way in the bottom right corner. When you do that you should just have one frame. Make sure it looks like the starting point—meaning the only layer that's showing in your layers panel is the first frame—and then go ahead and click the "Duplicate Frame" button. (It's the one that looks like a little page icon and is to the left of the middle in the panel.) This will create a new frame based on the previous one, and you can go ahead and display the next frame in your animation. I did this by creating each frame in its own layer, then showing only the one that was supposed to be visible. (You can see this demonstrated in the video up at the top of the post.) You'll need to repeat this process for every frame. Just press the "Duplicate Frame" button, show the next frame, and keep repeating the process until every frame has been added.
At this point you're basically done with the animation, but you'll probably want to set the duration to something other than the default. Generally the default is 10 seconds, which is very slow. Generally you'll want to set it to "No Delay", but you can fool around with the options and decide what you want. To choose a duration, just select all the frames you want to change and click on the duration on the bottom of one of the frames. Choose what you want, or set a custom amount. You may want to adjust individual frames to last slightly longer than others. Go ahead and play around with your options until you get the motion you desire.
Now all you have to do is save your image. Go to the File menu and choose "Save for Web & Devices". Be sure to choose GIF 128-bit Dithered as your preset and check the animation box in the bottom right corner of the screen (if it isn't checked already). You can make other alterations, but generally all you'll need to do here is save. Once you're done, that's it. You've created a cinemagraph.
That's all there is to it! If you make your own cinemagraph, share it in the comments!
Dissecting the new Windows 8 Start UI: Layers, Images and Colors oh my!
At BUILD, we were given loaner Windows 8 Developer Preview (WDP) PCs to tinker with. Shortly after, I was approached and asked: Can you figure out how to change the green background color present on the new Start UI? “That shouldn’t be hard”, I replied. Days later, it became obvious it was a little more complicated than that…

I won’t go through and map all 475 Colors here, but lets take a look at the Start UI again. The background color is driven by the Color named “ImmersiveStartBackground”. Tiles created from applications on the Classic Desktop (e.g. Visual Studio 11 Express) get their background appearance from the “ImmersiveStartDesktopTilesBackground” Color. Those same tiles also look to the “ImmersiveStartDesktopTilesText” Color for its text color.
So, back to the question from BUILD – how do you change the green background color?
If you’re not prepared to spend a lot of time on this, wait for updated Windows 8 bits featuring new Control Panel UI. No, really. I mean it. If you must, you can find the normal Color Set (g_ImmersiveColors) baked into Uxtheme.dll at file offset 0x96F30 (or 0x32E68 for x86) and the high-contrast Color Set (g_ImmersiveHighContrastMappings) at 0xA6BF0 (or 0×49058 for x86). (You can use my code above to map Color names to index positions.)

The Start UI makes use of at least three layers – a foreground (tile) layer, a background image layer, and a background color layer. Farthest from the eye is the background color layer, which is set to a single RGBA color (#0e6e39ff in this case) and fits to the dimensions of the screen. The optional middle layer contains an image used in conjunction with clever parallax scrolling to subtly hint visual depth. Floating on top are your tiles.
The Control Panel UI used to customize color throughout Windows 8 isn’t present in the WDP build, but you can gauge how customizable future builds of Windows 8 will be by inspecting its internal “Color Sets”. A Color Set is simply a collection (or set) of RGBA Color name and value pairs. Baked into the WDP are currently two Color Sets – one for normal use and one for high contrast use, identified internally as 0 and 1 respectively.
You can dig into these Color Sets using new APIs added to the Uxtheme library, e.g. GetImmersiveColorNamedTypeByIndex and GetImmersiveColorFromColorSetEx. I wrote a quick and dirty C# + Win32 application that iterated through the 475 defined Colors and printed out their names, values, and index positions.
[DllImport("uxtheme.dll", EntryPoint = "#100")]
static extern IntPtr GetImmersiveColorNamedTypeByIndex(uint dwIdx);

[DllImport("uxtheme.dll", EntryPoint = "#95")]
static extern uint GetImmersiveColorFromColorSetEx(uint dwColorSet, uint dwItemIdx, bool bIgnoreHighContrast);

static void Main(string[] args)
{
    for (uint i = 0; i < 475; i++)
    {
        var ppsz = GetImmersiveColorNamedTypeByIndex(i);
        Console.WriteLine("idx: {0}, name: {1}", i,
            Marshal.PtrToStringUni(Marshal.ReadIntPtr(ppsz)));

        //
        // We're only interested in the standard color set, hence the 0.
        //
        var rgba = GetImmersiveColorFromColorSetEx(0, i, true);
        Console.WriteLine("color: {0:X}", rgba);

        Console.WriteLine();
    }

    return;

}
I won’t go through and map all 475 Colors here, but lets take a look at the Start UI again. The background color is driven by the Color named “ImmersiveStartBackground”. Tiles created from applications on the Classic Desktop (e.g. Visual Studio 11 Express) get their background appearance from the “ImmersiveStartDesktopTilesBackground” Color. Those same tiles also look to the “ImmersiveStartDesktopTilesText” Color for its text color.
So, back to the question from BUILD – how do you change the green background color?
If you’re not prepared to spend a lot of time on this, wait for updated Windows 8 bits featuring new Control Panel UI. No, really. I mean it. If you must, you can find the normal Color Set (g_ImmersiveColors) baked into Uxtheme.dll at file offset 0x96F30 (or 0x32E68 for x86) and the high-contrast Color Set (g_ImmersiveHighContrastMappings) at 0xA6BF0 (or 0×49058 for x86). (You can use my code above to map Color names to index positions.)

One quirk you’ll quickly discover is that changing the “ImmersiveStartBackground” color isn’t enough. Unfortunately, whomever designed the placeholder parallax image opted out of the use of alpha-transparency and simply used an opaque green color. If you must change these images, you can find the PNGs in shsxs.dll – resource items 5231 and 5232.
G+7 Adds Google+ To Your Windows Desktop

Windows 7: If you love Google+ but wish you could access your stream on the desktop, G+7is a
Windows 7 gadget that sits on your desktop and gives you access to your stream, complete with links, images, and the ability to open them quickly if you see something interesting.
Similar to previously mentioned Tab for Google+, once you're logged in, the app will keep your stream up to date at all times. Since the utility is a gadget, you can move it around the desktop so it lives anywhere you want. If you see a post or item in your stream that you'd like to read, you can click it to open it in a mini-browser off to the side, and then click again to bring it up in your default browser.
G+7 is just one of many utilities meant to make Google+ more accessible and easier to stay connected with. It's free, and supports Windows 7 only.
- G+7 | Kalamon Software
HotKeyP Lets You Add Keyboard Shortcuts for Any Windows Command or Application

Windows: HotKeyP is a free utility that allows you to create custom keyboard shortcuts to launch any application, perform any Windows system command, open any document or folder, and more. If you're the type who prefers to work with as many keyboard commands as possible, the app is worth a look.
HotKeyP supports multimedia keys if you have them on your keyboard, and allows you to assign any key command you like (as long as it's not in use by Windows) to Windows system commands, launch applications or open specific folders, open specific documents, or load even load your favorite websites.
Plus, the app is portable, so you can toss it on a USB key or into your Dropbox account and run it from any system you use. Do you have a favorite app to add or manage keyboard shortcuts on your system? Let us know in the comments.
Tweak Your Favorite Web Site’s CSS with Stylebot
 Tweaks Chrome: Stylebot lets you easily adjust the style sheets of nearly any page using a button-based
The Stylebot Social site has lots of CSS tweaks that can be implemented easily even if you don't know what CSS means. (Cascading Style Sheets, btw, they control how a web site appears) In the past hour I've used Stylebot to reskin Google Docs as MS Office, a cleaner version of iMDB, and gone back to the old YouTube page. I'm really looking forward to seeing what the Stylebot community comes up with in the future.
Privacy watchdogs take note:
The notice you see about having access to your website data, tabs and browsing activity is automatically generated because Stylebot runs on every tab. Stylebot doesn't try to look at or store any of your private data. Bookmark access is required for the sync feature, if you enable it.
Stylebot is a free extension available in the Chrome Web Store.
- Stylebot | Chrome Web Store
Change Windows Clock Update Settings to Avoid Losing Minutes Every Week

In order to make your Windows clock as accurate as possible you should also consider tweaking your settings so the clock updates daily instead of weekly. This option is not available in Date/Time settings, but you can do it by setting a daily update as a task.
Technology blog One Tip a Day offers instructions on how to easily create a task that updates your clock daily.
- Click on the start button and type ‘Task Scheduler". Click on the link that appears.
- Click on ‘Create Task' and give the task a name. I used "Daily Time Update".
- In the General tab, click on the ‘Change User or Group' button and enter the name ‘Local Service'. Check the box for ‘Run with highest privleges'.
- Go to the ‘Triggers' tab and click ‘New'. Select ‘Daily' and choose a time for the task to run.
- Go to the ‘Actions' tab and add these two actions in order, one at a time:
- Choose ‘Start a program' enter%windir%\system32\sc.exewith the argumentsstart w32time task_started
- Choose ‘Start a program' enter%windir%\system32\w32tm.exewith the arguments/resync
- Choose ‘Start a program' enter
- Go to the ‘Settings' tab and check the box ‘Run as soon as possible after a scheduled start is missed'.
Save your task. If you want to make sure the task works properly you can right-click on the task name and run the task manually.
Most computers suffer from clock drift; differences of seconds or even minutes between the software clock that runs when your computer is on and the battery-operated hardware clock in BIOS. The most common reason for the drift is leaving your computer turned on for more than a day which can cause an estimated clock drift of a minute for every day without rebooting. Extreme temperatures, malware, and electromagnetic interference can also cause clock drift. You can see how far your computer's clock drifts from the NIST time server here.
Keep in mind that after adding the daily time task the Date/Time settings will still say the next synchronization is a week away.
Lion DiskMaker Creates Mac OS X Lion Install DVDs and Thumb Drives Automatically
We've shown you how to manually create a bootable Mac OS X Lion DVD or thumb drive, but now an app called Lion DiskMaker can automate the process for you. You just download it, insert the media you want to use to create your install, and let it take care of the rest.
 |
| Mac OS X Lion DVD Maker |
For Lion DiskMaker to work, you'll need to have a copy of Lion installed to your Applications folder. Once it's there, just launch the app and it'll locate it. Once it does, you'll get to choose what type of media you want to use to create the install disk. If you want to use something like an SD card instead of a USB thumb drive, you can still do that by using the thumb drive. Just choose what you want and let Lion DiskMaker handle the rest. If you want a physical copy of Lion but don't want to do much work to get one, this free little utility can help you out.
How to Burn Your Own OS X Lion Install DVD or USB Drive
Getting Lion from the App Store is convenient, but if you want a physical copy of the installation, you can easily make your own Lion install DVD or USB drive with Disk Utility.
If you want to do a clean installation of Lion (or you want to install it on a Hackintosh), you'll need to install it on some sort of physical media. Apple will be releasing a flash drive installer for a whopping $70 in August, but you don't need to wait (or pay twice the OS's price) to get it. It's very easy to burn Apple's installer to a single layer DVD or flash drive of 5GB or larger.
Important: Note that the Lion installer deletes itself if you upgrade, so if you want to do this, you have to do it before you update your computer to Lion. You can always re-download Lion after the fact, but geez, who wants to do that? Once you've got it on your system, here's what you do:
 |
| How to Install Mac OS X Lion from DVD or USB |
- Download Lion from the Mac App Store. The installer should show up in your Applications folder.
- Right-click on the installer and hit "Show Package Contents". Navigate to Contents > SharedSupport and look for a file called "InstallESD.dmg".
- Open up Disk Utility and drag the DMG file into the left-hand sidebar. If you're burning it to a DVD, insert your DVD, select the disk image in the sidebar, and hit the "Burn" button. Skip down to the last step to use it.
- If you want to burn Lion to a USB flash drive, plug it in and click on it in the left-hand sidebar in Disk Utility. Go to the Partition tab and select "1 Partition" from the dropdown menu. Choose "Mac OS Extended (Journaled) on the left.
- Hit the Options button under the partition table and choose "GUID Partition Table". You'll need this to make the drive bootable on a Mac. Hit the Apply button when you're done to format your drive (note: it will erase everything on the drive).
- Click on the "Restore" tab, choose the InstallESD.dmg file as the source and your flash drive as the destination. Hit the Apply button and it will create your bootable USB drive.
- Reboot into OS X and hold the option key when you hear the startup chime. You can boot into your DVD or flash drive from there.
You'll not only be able to install Lion from this drive, but you'll also be able to use Disk Utiltiy, recover from a Time Machine backup, and do everything else you could do with the old installation DVDs. Note that when you install Lion, it'll create a recovery partition with all these features anyway, so you don't need the DVD unless you're doing a clean install. Though it's always nice to have around in case something happens, like you erase your entire drive. Not that that's ever happened to me 3 times in one week or anything.
Popular Posts
-
 It's been about three years since Microsoft unveiled a new version of Office, and particularly with Windows 8 just months away from ...
 -
 There's general agreement that Sony stumbled out of the gate with the PlayStation 3. Months of intense hype were followed by a la...
 -
 Latest Windows Phone 8 rumor suggests that current Windows Phone devices will receive the update Microsoft has yet to come forward wi...
 -
Microsoft is holding an invitation-only press event in San Francisco today at which it is expected to debut the next version of its...
-
 Gaming & Gadgets Microsoft kick-started the "next-generation" of gaming on November 22, 2005, when the company release...
